Monday, March 18, 2013

100 Hours Sculpting: First Project

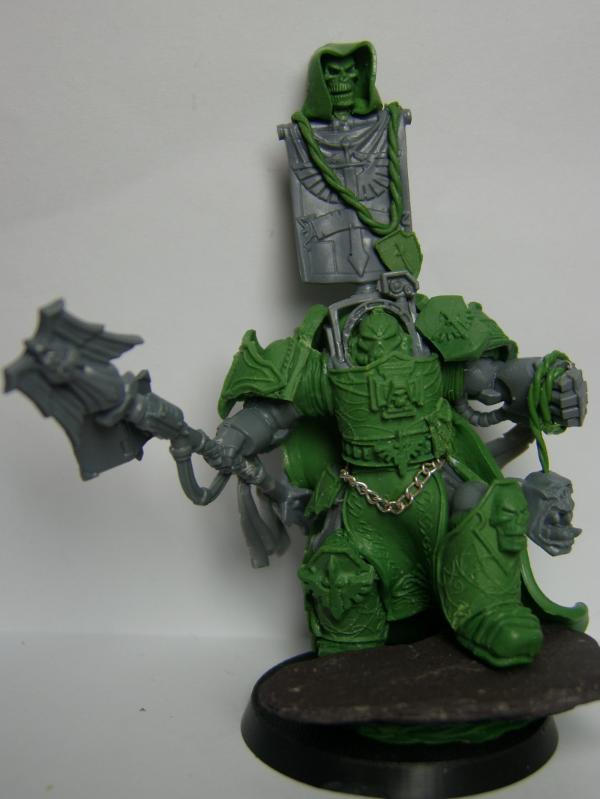
So, a couple weeks ago, I started a project bigger than anything I had ever done before. I converted a Space Marine into a standard bearer, painted it, and then did some freehand painting on the flag. Although it is not technically a sculpt (I started with a full miniature, so it's more of a conversion), I would like to share my technique, as well as some things that I learned using green stuff in this manner for the first time.

Techniques used


The banner was just about the only part of the model that was made of entirely green stuff, but I will not go into too much detail about the process I used. To make the green stuff banner, I used a technique very similar to the one found Here ( Instead of using talc to prevent the green stuff from sticking, I used water. Not a great idea on my part, but I didn't have anything better). I rolled out a ball of green stuff into a sheet, cut out a banner shape using an sharp X-Acto knife, and allowed it to dry in curve position, to simulate it "flowing" like a flag in the wind. The flag handle is just a thinly rolled rod of green stuff as well, which I did just using my hands.

What I Learned


First, I learned to definitely work in stages. Trying to work on/near green stuff that has not dried is a nightmare. My advice is to let a part completely dry before you do anything to the area. In this example, I tried to mix and use all my green stuff at once. I had cut the Space Marine's arms at the joints in order to re-position them, and I did the same with the legs. I attached the limbs in their new positions using green stuff and super glue. Before the green stuff had dried, I tried to attach my already-made green stuff banner to his hand. The whole thing fell apart. I didn't learn from my mistake the first time. I slowly put it back together, and then tried to start painting. Again, everything fell apart. So to sum up my point, you really should wait for

Another example to prove my point is the purity seals. I flattened out a sheet of green stuff and cut out two lines and a small circle for each seal. Then, stupidly, I tried to glue them to the model right away. They ended up looking smushed and disformed. I should have waited for each of them to dry completely before applying them.

Second, I learned to definitely use lubricant. I used water in this example, but I think I will be moving on to something like petroleum jelly next time. When I rolled out the green stuff into a sheet to make the banner and the purity seals, the water underneath the sheet would get displaced, and the putty would still stick.


I (also stupidly) did not take pictures throughout the whole process like I wanted to. I do have pictures of the finished model though. I was generally pleased with the outcome, but now I know a few things that I would do differently.


Overview:

Sculpting time elapsed: 1 hour (not including conversion, painting or putty-drying time).
Learned: Work in stages, wait for putty to fully dry, use a good lubricant.
Sculpting Time to go: 99 hours


My next sculpting project will be a true sculpt ( building up from nothing to make a full miniature). It is a huge step up, and I know I will make a lot of mistakes, but hopefully I will learn a lot as well, and that's the goal.

Sunday, March 17, 2013

Tips for Starting Warhammer 40k: Painting Basics 2

So, you have your miniatures all assembled and primed. What to do next? Well, assuming you have some brushes, it's time to talk about paints.

Paints

Starting out buying paints can be a little overwhelming at first. There are so many brands (GW, Reaper, Vallejo, Army Painter) and hundred upon hundreds of colors. Where do you start?

There is no "best paint brand" out there. It really depends on what you're painting and also your own preferences. I mostly use GW (Games Workshop) paints, with a couple Vallejo Game Color and general craft paints mixed in. Many beginners enjoy GW paints because they are specifically tailored to painting citadel miniatures, so you need to do very minimal or no paint mixing, which can be extremely difficult for people just starting out. However, the new GW line has hundreds of colors, which total to about $450. For most of us this is not a realistic option.


Instead, a better option is to buy paints as you need them. This is sometimes more difficult, as won't have the colors you need right away. But when you are starting out, you should only need about 10 colors or so if you choose them well. As I stated in an earlier post, the GW starting paint set is great for this, although you may need to buy some additional colors.

If I were to recommend one paint brand over all others, it would be Vallejo (Game Color and Model Color are similar, I'm not 100% sure on the difference, but I prefer the former). They come in dropper bottles, which makes mixing paints easier (you can count the drops of each color used to recreate later) and they don't dry out. I don't think they have a starter paint set, so you should just buy the paints you really need.

When you have both your army and your color scheme chosen, you need to chose the paints you are going to use. Typically you will need a base color, a shade, a highlight, and a couple various other colors. For an example, I will chose the Dark Angels. Looking at the  Dark Angels color scheme, I can see that the colors are mostly dark green with some red parts as well. I chose a base of a pretty dark green (I used Caliban Green), a shade of Nuln Oil (a GW wash), a highlight of Moot Green mixed with a little bit of Caliban Green, and a few other colors, like Leadbelcher for the metal and Blood Red (now Evil Sunz Scarlet) for some other parts. I completed my entire model with just a few colors. You will need a few more colors to paint more complex models, but you can see the process here. The goal is to spend as little money on paints as possible, because the cost can really add up. 

---Games Workshop Paints---

Even after exploring all the other paint brands out there, many painters chose to use GW paints. There is nothing wrong with that, they are good paints. However, the new GW paint set  can be awfully deceiving. There are 144 paints, and many of them look nearly identical. Unless you have money coming out all bodily orifices, you can't afford to buy them all. Here are a few tips for the new GW paint line:

-   The "Basecoat" and "Layer" paints are almost identical in everything that counts. They can be used interchangeably. 
-    Instead of buying all 4 GW glazes, you can buy a "Glaze Medium", and make a glaze using any of your existing colors.
-    The GW washes are good. You should get at least the brown and black ones (Nuln Oil and Agrax Earthshade).Washes in general are almost a necessity in your painting arsenal (I will go over what they are, and how to use them, soon).
-     You don't have buy the whole range of one color ( i.e. all the shades of green, there are like 15 of them). You can buy the darkest and lightest of them and mix, like Moot Green and Caliban Green. I use those for just about all my greens, and I can add a little blue to make shades of turquoise.
-      The "Dry" paints can be avoided. They are meant for drybrushing, a technique I will go over soon. They are pretty much just lighter colors of some of the common layer paints. 
-      I haven't tried any of the Citadel "Texture" paints, nor have I heard bad or good things about them. I will do my research and get back to you.

Hopefully, with these tips, you can cut down your paint spending as much as possible. It's usually a good idea to know that you need a specific paint before going and buying it.

---Other Paint Brands---

There are lots of paint brands out there that I haven't tried. If you want to try a brand, don't be afraid. GW and Vallejo aren't necessarily the best, they just happen to be the ones I use and have access to. Sometimes, when you need a very large amount of some color, like for painting tanks, using a cheaper craft paint is the way to go. I usually don't like using certain craft paints, as mine sometimes don't thin well and leave streaks, but I'm sure others are good. Don't be afraid to branch out, but test them out on some practice miniatures first.


Overview: Buy the paints you know you will need. When in doubt, just buy Vallejo paints. I think they're awesome, and I don't even get paid to say that. You can always mix the paints you need using the ones you have, but if you are going to be using one A LOT, just buy that color. Make sure you have a basecoat color, a highlight and a shade color for you army (these are the ones you don't want to have to mix, because you don't want half your army to look one shade off from the other half). Test out paints from lots of brands of some test miniatures.

Thursday, March 14, 2013

Tips for Starting Warhammer 40k: Painting Basics 1

Painting Basics


When you're first starting playing Warhammer 40,000 you need to paint your miniatures (that's a given). Most tournaments have rules about painted miniatures (i.e. you need at least a basecoat, or up to 5 colors, etc). Either way, it is always better, in my opinion, to have an army that is fully painted instead of one that is just grey (or primed black).

In this post, I'm going over some basic painting tools and tips. I am breaking this up into several posts so it can be more easily digested.

Paint Brushes

When you start out, you only need a few brushes. if you keep them well maintained. I use only round brushes (the ones of the left column of the picture). The one's that you really need are the following ---

-A large/basecoat brush (Size 3 or 4)
- A standard size brush (Size 1 or 2)
- A detail brush (Size 0 or 2/0)
- Any brush size 0-2, for glue/drybrushing/liquid green stuff (one you don't mind ruining)

Not every company uses this size system. Army Painter and Games Workshop use names, like "Detail" and "Standard/Character". As your painting needs get more complex, you might need some more brushes (like a 3/0 or 4/0 brush for fine detail, or a larger brush for tanks and such).

Brush Maintainence

When you are first starting out, you don't need to worry about any fancy brush cleaners or anything like that. Just follow a few simple rules and you should be fine:

1. Never store your brushes tip-down. Ever. You can store them on their sides, or tips up in a cup or mug.

2. Always clean the paint off your brush. As soon as you are done painting, clean off your brush thoroughly and never let paint dry on it. Also, letting paint get down towards the base of the brush (where all the bristles converge) is bad, so try to only load up paint on the tip of the brush.

3. Try to keep a good tip on all your brushes. A brush is basically useless once it can no longer keep a good tip. If the bristles no longer come to a point at the end, but instead fray in all different directions, the brush should no longer be used for painting, only things like glue and maybe mixing paint.

If you are careful with your brushes, they should last you a long time.


Priming

Every model should be primed (spray painted) before being painted. This allows the paint to stick to the model better, and results in a better overall paint job. Usually, this is done with either black or white, but can be done in other colors (maybe a metal color for Necrons, or a blue for Ultramarines. This can be done with a spray gun, which I will go over much later). Additional coats of paint go on top of this. 
The choice of a white or black priming depends on the color scheme of your model. It's pretty simple: If you have mostly light colors, prime using white. If you use mostly dark colors, use a black primer. It's hard to make light colors cover a dark primer (painting white or yellow over black is very difficult). 
I will go over priming technique, as well as some things to look out for while priming, in a later post.


This has been a very brief introduction to painting, more to follow! Be sure to comment if you found this helpful or have any questions!

Friday, March 8, 2013

100 hours - Sculpting: Green Stuff

Although this is not technically part of my 100 hours diary, I want to take some time to talk about Green Stuff and sculpting miniatures in general. Sculpting has always fascinated me as a hobbyist. Seeing fully sculpted miniatures online, all I could think was "I want to learn how to do that!". So,  a while back, I purchased some Green Stuff, and messed around with it a little, but did not attempt anything major. These picture show what the possibilities are with green stuff, albeit with lots and lots of practice (just so you know, these are not mine, they are pictures of the level of sculpting I wish to accomplish).


Green Stuff Basics


For those of you who are unfamiliar with Green Stuff, aka Kneadatite, it is a two-part epoxy sculpting putty used by many gamers to sculpt miniature and do conversions.

Green stuff is made up of two parts: The Base, which is yellow, and the Hardener, which is blue. It comes in two types: bar and strip form, both shown in pictures below. In both kinds, you create green stuff by mixing equal parts of the blue and yellow until the mixture is uniform. To change the properties pf the mixture, you can experiment using more or less of either color.

Immediately after mixing, green stuff becomes extremely sticky. Working with green stuff requires some kind of lubricant, which can be water, petroleum jelly, oil, spit, or any one of all sorts of things. Green stuff becomes progressively harder, and becomes mostly unworkable in an hour or so. It then takes a full 24 hours to fully harden. This hardening time can be shortened or lengthened depending on the temperature. If you wish to shorten the hardening time, increase the temperature slightly. I use a makeshift oven-type thing using a light bulb (pictures to come later). However, you shouldn't make it too hot, as Green Stuff can burn, and also "melt", blurring details. If you wish to lengthen the workability time of already mixed green stuff., maybe because you were interrupted and have to put off your project till the next day, you should just throw your mixed green in the freezer. This can allow you the green stuff to be workable for another day or two. After that, it will still be soft, but will be very rubbery and unusable.


Green stuff can be mixed with other sculpting putties for various properties. Although I have not experimented with this, I have heard good things about a 1:1 ratio mix of green stuff and Milliput, another sculpting putty. I plan to try it out soon.

Getting Started with Green Stuff

Obviously, before you start out with green stuff, you need to buy some. In this regard, there is definitely a right way and a wrong way. Green Stuff, even though it is all pretty much the same stuff, can cost 5 times as much (or even more) from some companies than from others. Games Workshop sells the stuff fairly expensive, but not as much as some other companies. I bought a strip from Army Painter, and I was very disappointed in how much I got (I bought it online, and the picture did not match what I got). In general, look for green stuff under the name Kneadatite, it is much cheaper. Look for tubes (approx $10) or the strip (approx $15) shown above, and you should be all set.


So that's about it. Green Stuff is not terribly forgiving, but it can be used to create great things. It really just takes lots of practice and patience, just like most things. Keep an eye out for my first actual 100 Hours - Sculpting post, which will be coming very soon!

Wednesday, March 6, 2013

Tips for Starting Warhammer 40k #1

Tips for Starting Warhammer 40k : Post #1

This post will be a general guide for starting the hobby. Before you go out and buy a ton of models, or give up on the hobby entirely, just read this. It will hopefully give you a clear perspective of what to expect and how to go about it.


So, you have decided that you are interested in Warhammer 40,000! That's cool.  It is very fun and rewarding for lots of people. For others, it is a money-suck that ends in them having a ton of unpainted models in a box somewhere. That's what happened to me for a while, and it really sucked. So, I made it one of my goals to prevent this from happening to as many people as possible.

First thing's first...

Before starting anything major, you should probably weigh the pros and cons. Warhammer has a few of both. 

Pros
- It is very rewarding to see a finished model that is painted well (or even just ok).
- Playing the game with friends can be very fun.
- The gaming community is great


Cons
- It can get VERY expensive (this is the big one).
- It can get very time consuming.


Obviously there are more for both categories, and it varies from person to person. If you can think of any more, leave a comment! 

Actually Getting Started


Once you have decided that Warhammer is right for you, it's time to get started. There are a couple things to consider before making your first purchase. How much money are you willing to spend? Is there a particular army you have always had your eye on? (It might be a good idea to check out the "Picking an Army" label if you are unsure on what to chose, or just want some more info on your favorite army). Do you have some friends that would want to get started with you? 

The absolute first thing you should do is look around at all there is to offer. This can be in your local hobby store, or just online. If you're up for it, probably the best way to get acquainted with the game is two watch two people play. This can be as simple as sitting in on a game in progress at a hobby store (as long as they don't mind). Players are generally very helpful and willing to give tips to anyone who asks. Otherwise, just go to Games Workshop and browse. Look at the models, the paint schemes, everything. You want to be able to make your decisions as educated as possible.

If you are starting fresh, I suggest just buying the Warhammer 40,000 Paint Set. It comes with a brush, a few  basic paints, and 5 Space Marines. Just assembling and painting these miniatures might just be enough to let you know if the hobby is good for you or not. Even if the paint job came out not so great, as long as you had fun doing it, that's good! Nobody is good when they start. But if you were miserable doing it, that does not bode well for your Warhammer future. 

SIDE NOTE---  If both you and a close friend are joining the Warhammer 40k legions together, you can always go halfsies on a box set, like Dark Vengeance. It has both Dark Angels and Chaos Space Marine starting forces, as well as a mini-rulebook, dice, and templates. Basically, everything two people need to start playing.  ---- 

Once you have a taste for Warhammer, or just want to get right into it, buy a squad of basic infantry for the army you want (Again, look at "Picking an Army" if you haven't decided), and maybe an HQ choice. Nothing more. An HQ and two troops choices are all you need to play a basic game! Also, you should make sure that you actually enjoy painting/playing with that particular army before you go crazy buying things. I know the tanks and some elite squads look super cool, but you won't need them for a while. Also, having a ton of unpainted models can be kind of demoralizing, and may lead to you giving up (and we don't want that!). 

Once you have really, really decided an army is when you should finally start to branch out and pick up more elite, fast attack and heavy support choices. That's when things start to really pick up. You can play big games with lots of models, and sometimes it's just satisfying to look at your army all assembled together in one place (preferably painted as well).

The Next Step...

Once you have a small army amassed, you're free to do whatever you want. Find some friends to play with. Go to you're local hobby store and ask around. I'm sure there are some veterans who would love to show you the ropes, or other newcomers who would love to learn with you. Most players are friendly people, you just need to talk to them.
Also, check out some Warhammer forums. My personal favorite is DAKKADAKKA. There is so much useful information here, you just have to find it.


So, there was my first in a long line of (helpful?) tips on Starting to play Warhammer 40k. Keep an eye out for the label "Starting Out Tips" for more like it!
Please comment if you found this helpful, unhelpful, or just have any general questions or ideas!


-Dana


Agenda for the next bunch of months

So far, I have given some tips on picking a Warhammer 40k army, and shown you guys what I have in terms of models, paints, etc. Now, I'm putting together a list of things I want to do over the next few months or so. I probably won't do them in any particular order, so just keep an eye out for the ones you are interested in. Here we go:

1. Tips for Starting Warhammer 40k : I want to just give a more in-depth look at the risks and rewards of starting to play Warhammer 40k, as well as some helpful tips for getting started. I am leaving this open-ended on purpose, so if I learn/think of anything else, I can share it.

2. 100 hours -  Painting : One very useful thing I have seen across the internet is a 100 hours blog. It consists of multiple posts about a given experience, each consisting of pictures, tips, and things they have learned. In this case, it will be about painting Warhammer 40k miniatures. Starting at 0 hours, I will discuss each of my painting projects and slowly accumulate hours towards my 100 hour goal. This should take a while (100 hours is a very, very long time in terms of 1-2 hour painting sessions), but I will be posting regularly (probably weekly).

3. 100 hours -  Sculpting : I will do this in the same fashion as my Painting one, detailed above. I will be using green stuff, an epoxy sculpting putty, to do various sculpting projects and conversions. Sculpting is something that has always fascinated me. To be able to sculpt and then paint my own miniatures is my dream as a hobbyist. I have not done any sculpting yet, only small conversions, so this will be very interesting and fun ( I hope).


In addition to the things above, I will post just any new ideas I come up with. Keep checking back for more tips, tutorials, and other information about Warhammer 40k.

Tuesday, March 5, 2013

What I'm starting with...


Now that I'm done with the "Picking an Army" portion, I'm on to the painting and modeling portion. First, I want to show you guys what I'm working with. I started Warhammer 40k back like 6 or so years ago, and started back up recently. I started with Dark Eldar, but quickly moved on to Chaos Space Marines. Since then, I have branched out to almost all races, with the intent to paint more than play. Now, onto the goods...

Figure Cases


 To the right is a picture of my two figure cases. One is a Games Workshop case, the other is one I made. I made it out of a box with foam for packaging fruit (It was in my basement somewhere).
A figure case is a must-have. I used to not have one, and that was one thing that killed my desire to play. I kept all my figures in a box, and they seemed to always be broken. It really kills the painting mood when you need fix a model  and wait for the glue to dry before you can paint it.
You can either buy a figure case (they are pretty expensive though), or make one. With all the materials basically free, you should at least try to make one before spending 60-90 bucks on a Games Workshop one. Sometime I will post a tutorial on how to make a case, but for now you can check on Warhammer 40k forums, there are plenty of them.

Miniatures 

Pictured to the right are all the miniatures I have painted, minus a bunch of Dark Eldar and Chaos Space Marines that I stripped and re-primed. Most of them are completed, save for basing (right now, the bases are just painted green, as I am going to put fake grass on them later). I hope to drastically increase the number of models I have painted in the coming months. None of these are particularly well painted, some are ok though. As I paint more miniatures, I hope to see an improvement in my painting ability over time.

Below are the miniatures I have to work with. Many I bought on my own, and the rest belonged to a friend of mine who gave up on Warhammer and let me buy his stuff. I have lots of Chaos Space Marines and Dark Eldar (I have some tanks and larger things from those armies but not at school with me), as well as a squad or two from Grey Knights, Space Marines, Eldar, Chaos Daemons, Necrons, Orks, Tau and Tyranids.


Reference Material

Pictured above are all my Codexes, my two rule books, and a couple of White Dwarf magazines. These are an invaluable resource when it comes to painting, and also they are pretty fun to read for background information on the races. I have both new and old versions for many races. With almost all my miniatures, I am painting them using one of the color schemes in the codex. Eventually, I hope to make my own color schemes and paint miniatures using original schemes (i.e. creating my own Tyranid hive fleet, or Space Marine Chapter).


Materials

These are the paints, brushes and general modeling materials I have paints of 3 different types (Games Workshop, Vallejo Game Color and Reeves). I don't really have an opinion on paint brands, they all seem to come out the same. Then only difference I see is how much they need to be thinned. 
I have about a bajillion paint brushes as well, in all shapes and sizes. My favorite brushes are Sable, which are on the more expensive side, but they are worth it. My suggestion is to get just a couple good quality brushes, and then a few cheaper ones for other things such as stirring paint, drybrushing, painting on glue, etc. 
The plastic case on the upper-right is green stuff, a modeling epoxy putty used for sculpting. Although I haven't done a whole lot of work with it yet, I hope to do some very soon.


So, that's an overview of what I have in terms of Warhammer stuff. I probably wont buy any more for a while; it will take me a long, long time before I'm done painting these ones. My next post will be an agenda for the next few months. I have a lot of plans, and I hope you will enjoy them.


-Dana