My First Ork/First Painting project
In this post, I will detail my latest painting project, which is my first project back from break. I think it went pretty well, and it is one of my best models yet. I will go through my painting process with photos, explain what I did at each point, and recap what I learned.
Side Note --- I work on miniatures one at a time. This is definitely not the fastest way to paint them. I just like to learn from my mistakes as I go, so I don't end up with a bunch of models that all look bad from the same mistake. Also, because I am not playing Warhammer 40k, I have no tournaments or deadlines to meet, so I can take as much time as I need.
This is my basecoat of Caliban Green on the Ork's face. There is no need to be conservative with the paint, as long as it is thinned properly. Don't worry if you get your base coat everywhere, you will be painting over those other areas later.
The above left picture shows my next layer, which is about a 1:1 mix of Caliban Green and Moot Green. I used it to cover almost all areas, except for the deepest recesses.
The above right picture show the model after it has been washed with Thraka Green mixed with a tiny bit of Nuln Oil. A highlight of Moot Green was then applied to only the most raised edges of the model (some areas on the face, edges of fingers, etc.).
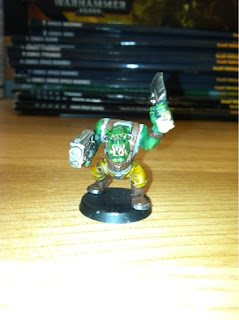
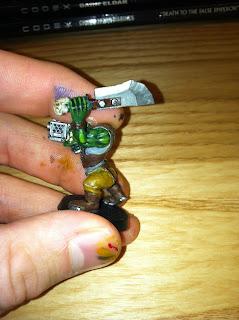
These final four pictures show the model completely finished (besides basing, which will be done later). I skipped a couple steps with the pictures, but I will explain everything. All metal parts, which had previously been painted with Boltgun Metal (also called Leadbelcher) were washed with Nuln Oil and highlighted with Runefang Steel. The straps on his arms and backpack, as well as his boots, were painted with Scorched Brown. His pants were painted with Snakebite Leather, washed with Agrax Earthshade, and highlighted with Kommando Khaki. His teeth and the skull on the end of his sword were done basically the same way as the pants, but with another highlight of Screaming Skull. His eyes were painted with Red Gore. After this was all done, the model was coated with a Matt Varnish.
After that, I just went back and touched up some things. It is by no means perfect, but I am pretty proud of it, especially as my first painting project back.
I learned a couple things too. I should base coat everything first, not just work on one part at a time. I did the Ork skin, then the vest, then the pants, when I should have been working on them simultaneously. I had to sit and wait for some of the washes to dry, because there was nothing else for me to work on. I also learned I need to take better care of my brushes, as one of my favorites is starting to fray! I think I will do a brush-cleaning tutorial soon, even though its pretty straightforward.

These are a mixture of old and new GW paints. To find out the new equivalents to the old paints, look at the Citadel paint conversion chart Here.
Overview:
Learned: Basecoat everything first, take better care of brushes.
Painting Time to go: 94 hours


No comments:
Post a Comment