Techniques used
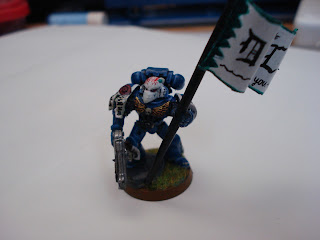
The banner was just about the only part of the model that was made of entirely green stuff, but I will not go into too much detail about the process I used. To make the green stuff banner, I used a technique very similar to the one found Here ( Instead of using talc to prevent the green stuff from sticking, I used water. Not a great idea on my part, but I didn't have anything better). I rolled out a ball of green stuff into a sheet, cut out a banner shape using an sharp X-Acto knife, and allowed it to dry in curve position, to simulate it "flowing" like a flag in the wind. The flag handle is just a thinly rolled rod of green stuff as well, which I did just using my hands.
What I Learned
First, I learned to definitely work in stages. Trying to work on/near green stuff that has not dried is a nightmare. My advice is to let a part completely dry before you do anything to the area. In this example, I tried to mix and use all my green stuff at once. I had cut the Space Marine's arms at the joints in order to re-position them, and I did the same with the legs. I attached the limbs in their new positions using green stuff and super glue. Before the green stuff had dried, I tried to attach my already-made green stuff banner to his hand. The whole thing fell apart. I didn't learn from my mistake the first time. I slowly put it back together, and then tried to start painting. Again, everything fell apart. So to sum up my point, you really should wait for
Another example to prove my point is the purity seals. I flattened out a sheet of green stuff and cut out two lines and a small circle for each seal. Then, stupidly, I tried to glue them to the model right away. They ended up looking smushed and disformed. I should have waited for each of them to dry completely before applying them.
Second, I learned to definitely use lubricant. I used water in this example, but I think I will be moving on to something like petroleum jelly next time. When I rolled out the green stuff into a sheet to make the banner and the purity seals, the water underneath the sheet would get displaced, and the putty would still stick.


I (also stupidly) did not take pictures throughout the whole process like I wanted to. I do have pictures of the finished model though. I was generally pleased with the outcome, but now I know a few things that I would do differently.
Overview:
Sculpting time elapsed: 1 hour (not including conversion, painting or putty-drying time).Learned: Work in stages, wait for putty to fully dry, use a good lubricant.
Sculpting Time to go: 99 hours
My next sculpting project will be a true sculpt ( building up from nothing to make a full miniature). It is a huge step up, and I know I will make a lot of mistakes, but hopefully I will learn a lot as well, and that's the goal.


No comments:
Post a Comment